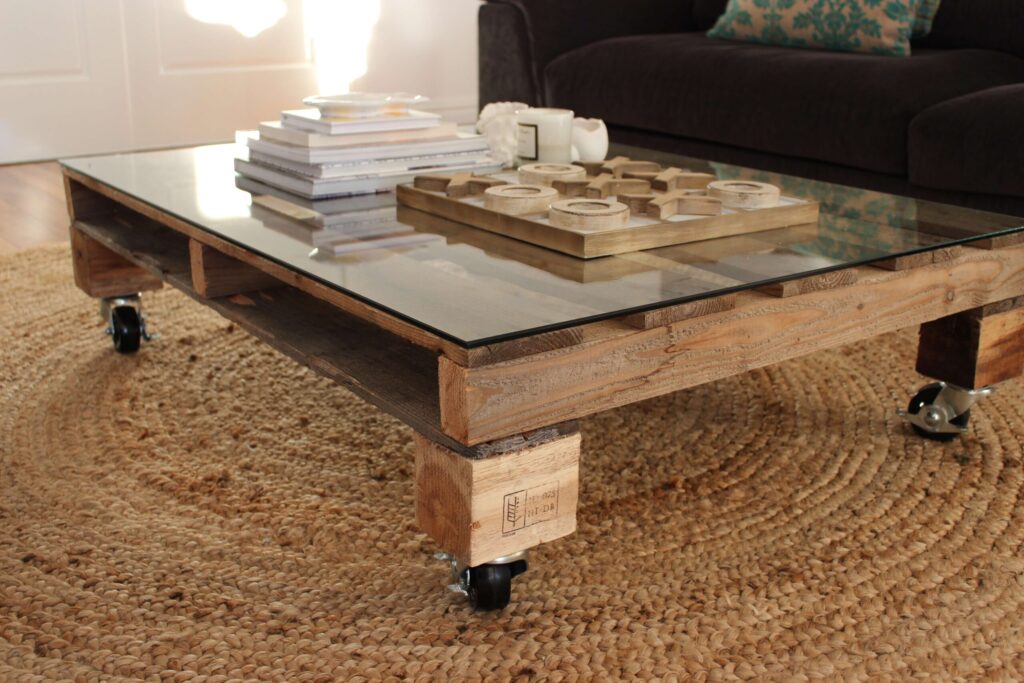
Looking for a stylish centerpiece that won’t break the bank? Building your own pallet coffee table is one of the easiest ways to create rustic furniture that’s both functional and beautiful. This budget-friendly home decor project is perfect for beginners who want to dip their toes into woodworking with recycled wood.
Materials and Tools You’ll Need
Before you start, make sure you have these essentials ready:
Materials:
- 1–2 heat-treated wood pallets (marked “HT”)
- Four 4×4 wooden legs (cut to 18–20 inches)
- Wood screws (2.5 to 3 inches)
- Wood glue
- Sandpaper (80 and 120 grit)
- Wood stain or paint (optional)
- Polyurethane or wood sealer
- Caster wheels (optional)
Tools:
- Hammer or pry bar
- Drill and bits
- Sander or sanding block
- Saw (circular or hand)
- Measuring tape
- Clamps
- Safety gear (gloves, goggles, dust mask)
Also Read Build It Yourself: 5 Easy Woodworking Projects for Beginners That Aren’t Scary
Step-by-Step Guide to Building a DIY Pallet Coffee Table
1. Pick the Right Pallets
Always choose pallets that are stamped “HT” (heat-treated). This means they are safe for indoor use. Avoid any that are damaged, wet, or marked “MB” (chemically treated).
2. Break the Pallets Apart
Use a hammer or pry bar to remove the planks from the frame. Go slow to avoid splitting the wood. Remove all leftover nails and screws.
3. Sand Everything Down
Smooth out the wood with 80-grit sandpaper first. Then finish it off with 120-grit. You want the surface to be clean and splinter-free. A sander will save time, but elbow grease works too.
4. Arrange and Build the Tabletop
Lay out your planks on a flat surface. Line them up until you’re happy with the size and look. Apply wood glue between the boards and clamp them together. Let it dry fully. Then screw two boards across the bottom to hold it all in place.
5. Add the Legs
Cut four pieces of 4×4 lumber to your desired height (standard is about 18 inches). Attach them at each corner using wood screws and glue. Make sure they’re straight to avoid a wobbly table.
6. Optional: Build a Lower Shelf
Want extra storage? Add a second layer. Screw more pallet planks a few inches above the floor to make a shelf. Great for magazines, baskets, or board games.
7. Stain or Paint Your Table
This is where your table becomes “yours.” Pick a wood stain for that warm farmhouse look or go bold with colored paint. Always let it dry completely before sealing.
8. Seal It
Apply a coat of polyurethane or wood sealer to protect your new coffee table. This will guard against spills, scratches, and moisture.
9. Optional: Add Caster Wheels
Want your table to roll? Add caster wheels to the legs. It’s a smart move if you plan to move it around often.
Helpful Tips for First-Time Woodworkers
- Check for splinters before final assembly. Sand again if needed.
- Use clamps to hold planks in place while gluing.
- Seal all sides of the wood, including the bottom, for a longer lifespan.
- Go rustic! Don’t stress about perfection—pallet furniture is all about character.
Why Choose Pallet Wood for DIY Furniture?
- Affordable: Often free or very cheap.
- Eco-friendly: Keeps wood out of landfills.
- Strong and durable: Built to hold heavy items.
- Perfect for rustic decor: Adds natural texture and charm.
Final Thoughts
Building a DIY coffee table with pallet wood is a fun and satisfying project. It’s perfect for anyone starting out with woodworking or just looking for a cheap and easy furniture idea. With a little effort, you can turn scrap wood into something that looks store-bought.
So roll up your sleeves and start building. Your living room is about to get a serious upgrade—with a personal touch.